

In previous blogs, we explored the use of various sensors along with Arduino such as IR, Bluetooth, and ultrasonic. Now, let’s delve into the Soil Moisture sensor. This sensor is very important in smart gardening, enabling us to monitor the moisture levels in potted plants. This data serves as a cornerstone for automated watering systems, ensuring plants receive just the right amount of water to thrive.
What is a Soil Moisture Sensor?
A Soil Moisture Sensor measures the water/moisture content in the soil. Achieved by utilizing either a resistive or capacitive sensor. Despite their differing methods, both sensors share a similar concept.
Resistive Sensor.
The resistance-based Soil moisture sensor is widely available and economical. Its operation is straightforward: probes are inserted into the soil to measure resistance. Resistance is inversely proportional to the amount of water content in the soil. That is, the higher the moisture, the lower the resistance and vice-versa.
There are a few different types of sensors in the market, one which has an Amplifier module and another that is basic and uses only a transistor.

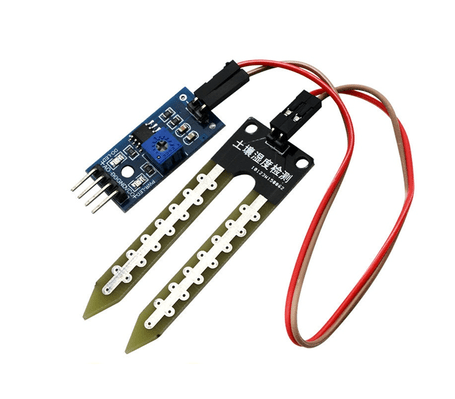
However, resistive sensors come with some limitations. Chief among them is the issue of corrosion. Since the exposed probes are immersed in water and DC passes through them, electrolysis takes place, leading to corrosion. Over time, this corrosion damages the probes, eventually rendering the sensor unusable.
Capacitive Sensor.
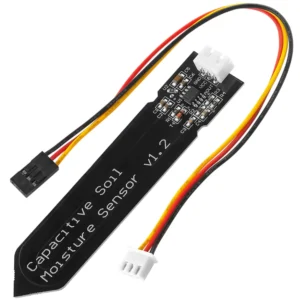
Capacitive Soil Moisture sensors utilize the soil itself as a capacitive element, leveraging its ability to store charge. This approach enables the sensor to calibrate itself based on the water content present in the soil. Without the exposed coppers this module is more robust and gives accurate readings. The only con is its price which is twice as much as a resistive one.
How to measure Soil Moisture using Arduino?
Before we begin, let’s gather the necessary components for this project. Below, I’ve provided affiliate links to purchase the required products, supporting our free blog with a small commission.
| Arduino | Amazon Global | Amazon IN | Aliexpress |
| Soil Moisture Sensor | Amazon Global | Amazon IN | Aliexpress |
| Relay Module | Amazon Global | Amazon IN | Aliexpress |
Do not worry if you don’t have the hardware setup, this learning experiment can be done on the TinkerCAD Circuits simulator.
Calibrating the sensor.
As the Soil Moisture sensor gives us an Analog value, we need to first take measurements to calibrate. First, make the connections as follows:
- Connect the VCC of the sensor to 5V of Arduino.
- Connect the GND to the GND
- Connect the A0/Signal pin to any Analog pin, in this case, we will go with A5.
After making the connections, upload the following code.
#define sensPin A5
#define sensState 4

int val = 0;

void setup()
{
  Serial.begin(9600);
  pinMode(sensState, OUTPUT);
  pinMode(sensPin, INPUT);
  digitalWrite(sensState, LOW);
  delay(200);
}

int sensorData()
{
  digitalWrite(sensState, HIGH);
  delay(50);
  val = analogRead(sensPin);
  digitalWrite(sensState, LOW);
  return val;
}

void loop()
{
  int data = sensorData();
  Serial.print("Soil Moisture: ");
  Serial.println(data);
  delay(1000);
}
Let’s take two readings: first with dry soil, simply insert the probe into a pot and record the reading. This represents the lowest value (e.g., 50). Next, add water slowly until the soil reaches the desired moisture level for the plant. Record the reading at this point (e.g., 500).
Controlling a Relay
Now that we have calibrated the sensor, we have the necessary readings to make a smart device that will water a plant when the moisture level is below a certain point.
#define sensPin A5
#define sensState 4
#define relayPin 13

int val = 0;

void setup()
{
  Serial.begin(9600);
  pinMode(sensState, OUTPUT);
  pinMode(sensPin, INPUT);
  pinMode(relayPin, OUTPUT);
  digitalWrite(sensState, LOW);
  digitalWrite(relayPin, LOW);
  delay(200);
}

int sensorData()
{
  digitalWrite(sensState, HIGH);
  delay(50);
  val = analogRead(sensPin);
  digitalWrite(sensState, LOW);
  return val;
}

void loop()
{
  int data = sensorData();
  data = map(data, 0, 872, 0, 100);
  Serial.print("Soil Moisture: ");
  Serial.print(data);
  Serial.println("%");
  delay(1000);

  if(data <= 20)
  {
    Serial.println("Soil Moisture low ");
    delay(500);
    digitalWrite(relayPin, HIGH);
  }
  else if(data >= 90)
  {
    Serial.println("Soil Moisture perfect.");
    digitalWrite(relayPin, LOW);
  }
}
Here we have defined an additional pin (Digital pin 13), which can be used to control the relay.
Conclusion.
I hope now you understand how a soil moisture sensor works and how you can use it with an Arduino. Now you can use the sensor with different modules and make some awesome projects like a smart gardening system!
If you find this tutorial informative, subscribe to receive notifications for similar content in the future.