

In the previous tutorial, we learned how to use old IR remotes to control a robot car. If you haven’t checked that article, here is a link. But IR isn’t the only way to control devices. There are other means of wireless communication like RF, WiFi and Bluetooth.
In this article, we will learn how to use Bluetooth to control LEDs with the help of Arduino. So without wasting any more time, let’s get started.
Gathering Components.
Disclaimer: This blog contains Amazon and Banggood Affiliate links. Buying products from those links helps us run this blog without any extra charges on you.
| Arduino Nano | Arduino Global | Amazon IN | Aliexpress |
| HC-05/HC-06 Bluetooth Module | Arduino Global | Amazon IN | Aliexpress |
| 1 x 2.2K Resistor | Arduino Global | Amazon IN | Aliexpress |
| 1 x 1K Resistor | Arduino Global | Amazon IN | Aliexpress |
| 2 x LEDs | Arduino Global | Amazon IN | Aliexpress |
| Breadboard Kit | Arduino Global | Amazon IN | Aliexpress |
Bluetooth Connection:

The connections are simple,
- VCC = 5V
- GND = GND
- TX = RX
- RX = TX
However, we cannot connect the RX pin of the Bluetooth module directly to the Arduino. That’s cause the module operates on a 3.3V logic level and Arduino operates on 5V logic. Directly connecting these pins can damage the Bluetooth module. So we need a voltage divider so the RX pin receives only 3.3V.
To make a voltage divider, all we need are two resistors (1K and 2.2K). Connect them as shown in the image above and you are good to go.
Also, I have connected 2 LEDs to Pin 7 & Pin 8 of Arduino which we will control using a Smartphone.
Coding:
Copy the code from below and open it in IDE.
/*
*Arduino Code to control 2 LEDs using Smartphone over Bluetooth.
*Code by Harsh Dethe
*Projecthub.in
*/

// Sets LED Variables
const char LED1 = 7 ;
const char LED2 = 8 ;

// Commands
const String LED1_ON = "1:1" ;
const String LED1_OFF = "1:0" ;
const String LED2_ON = "2:1" ;
const String LED2_OFF = "2:0" ;

// Stores Serial data
String cmd = "" ;

// Setup when Arduino boots
void setup()
{
  Serial.begin(9600);

  // Sets pin 7 & 8 as OUTPUT
  pinMode (LED1, OUTPUT );
  pinMode (LED2, OUTPUT );

  // By default LEDs are OFF
  digitalWrite (LED1, LOW);
  digitalWrite (LED2, LOW);
}

// Repeats continuously after boot
void  loop ()
{
   if(Serial.available()) //Checks if Data is available
   {
     cmd = Serial.readStringUntil('\ n'); //Stores Data in 'cmd' until new line
     cmd.trim(); //Trims off any spaces
     Serial.println("Command:" + cmd); //Prints command in Serial Monitor

    // Control LED 1
     if(cmd == LED1_ON) //If cmd is LED1_ON
     {
       digitalWrite(LED1, HIGH); //LED1 turns on
       Serial.print("LED 1 ON");
     }

     if(cmd == LED1_OFF) //If cmd is LED1_OFF
     {
       digitalWrite(LED1, LOW); //LED1 turns OFF
       Serial.print("LED 1 OFF");
     }

    // Control LED 2
    if(cmd == LED2_ON) //If cmd is LED2_ON
    {
       digitalWrite(LED2, HIGH); //LED2 turns ON
       Serial.print("LED 2 ON");
    }

    if (cmd == LED2_OFF) //If cmd is LED2_OFF
    {
       digitalWrite(LED2, LOW); //LED2 turns OFF
       Serial.print("LED 2 OFF");
    }
  }
}
The code is well commented so I don’t think it is necessary to explain it again. You can save this as “.ino” fine and upload it to the Arduino Nano.
NOTE: Before you hit upload, Make sure you remove the Bluetooth Module. The TX and RX pins should not be connected to any other device while uploading codes or you will get errors.
Arduino Remote LITE:
Now that we have a circuit ready and the code uploaded, we just need to get an app which will help us toggle the LEDs on and off. The app we will use for this purpose is the Arduino Remote LITE app which is available on Playstore.
Once installed, you will open it and allow it the permission to turn on Bluetooth.
Now power the Arduino and the Bluetooth module should start blinking.
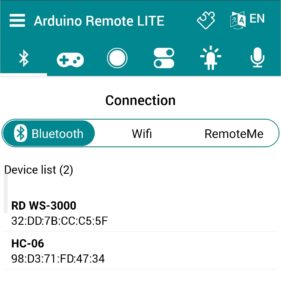
Next, check the App for Bluetooth devices and connect to the HC-05/HC-06 from the list.
It will take a second or two to connect, it might ask for a password. If it does just try ‘0000’ or ‘1234’.
Once the Bluetooth is connected to HC-06, it will stop blinking.
Now click on the third tab from the top and you will see a list of relay switches. We will use the first two of these to turn the LEDs on/off.
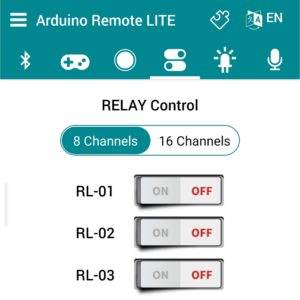
Here, the first two switches will turn the LEDs on and off.
How it works?
The Bluetooth Module and Arduino communicate Serially Through RX and TX pins.
When the switch is toggled it sends a command serially to Arduino via Bluetooth. This command is then saved in a variable and verified in an if-else statement. If the command matches, action is taken. E.g.: LED turns on.
That’s all for this article, it was a basic tutorial for beginners. Now you can get a Bluetooth module and start experimenting. In future articles, we will use this knowledge to build cool projects. So stay tuned.
One thought on “Arduino Bluetooth Basic Tutorial”