Welcome back, makers! Today, we’re checking out something truly exciting—the DFRobot Gravity: Voice Recognition Module. This offline voice control board supports both I²C and UART communication. It also offers features like built-in voice feedback, a customizable wake-up word, and 121 preloaded voice commands.
In this post, we’ll explore how the module works, walk through its setup, and wrap up with the pros and cons. So, without further delay, let’s dive in!
Introduction to DFRobot Offline Voice Recognition Module.
The Gravity: Voice Recognition Module by DFRobot is a smart little board that can recognise over 120 built-in voice commands and even lets you train your own custom commands — all while working completely offline.
Designed to work with popular platforms like Arduino, ESP32, and Raspberry Pi, this module supports both I²C and UART, making it super flexible for integration. It even has a built-in speaker for real-time voice feedback and dual microphones for better noise handling, which means it works great even in slightly noisy environments.
Technical Specifications:

| Operating Voltage | 3.3V – 5V |
| Maximum Operating Current | ≤370 mA (5V) |
| Communication | I²C/UART |
| I²C Address | 0x64 |
| Fixed Command: | 121 |
| Custom Command | 17 |
| Onboard Microphone Sensitivity | -28db |
| Module Size | 49×32 mm/1.93×1.26” |
There isn’t much to it; the module is small, straightforward, and easy to use. Now, let’s walk through how to use this module with an Arduino UNO using the I²C interface.
What you’ll need:
Hardware:
| Component | Offical Website | Amazon |
| Arduino UNO or (RoMeo BLE) | Buy Now | Buy Now |
| Gravity: Offline Voice Recognition | Buy Now | Buy Now |
| LED Module (or use built in LED) | Buy Now | – |
| Breadboard + Jumpers | Buy Now | Buy Now |
Software:
- Arduino IDE
- DFRobot_DF2301Q library (install via Library Manager)
Connections:

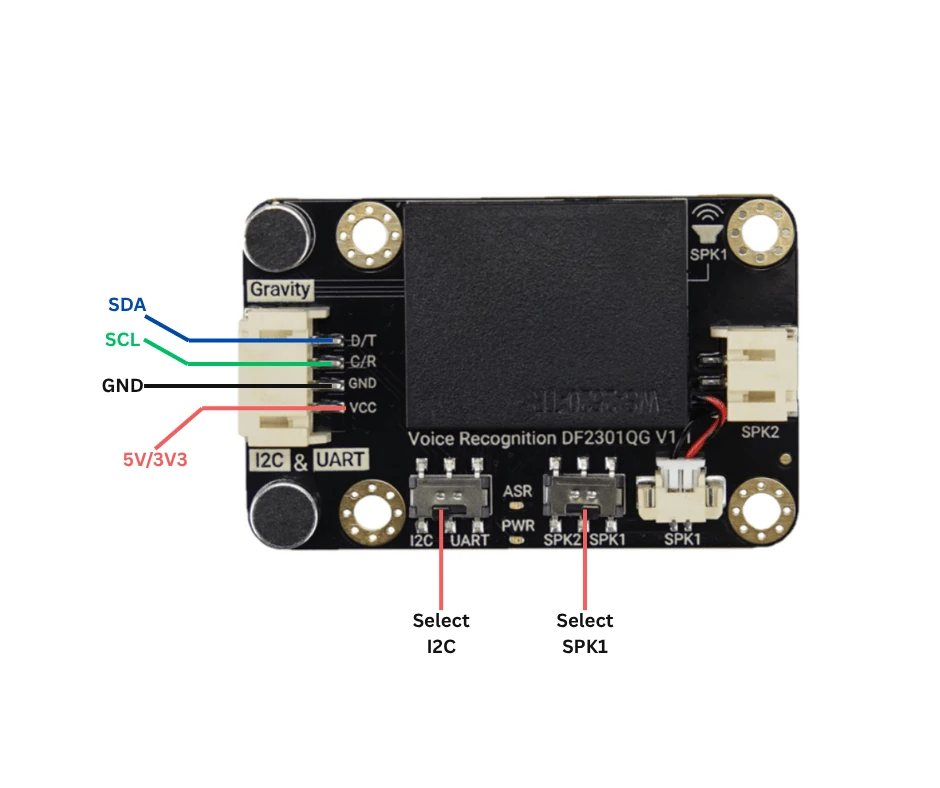
- Connect the VCC to 3.3V or 5V of Arduino.
- The GND should connect with the GND pin of Arduino.
- Connect the D/T pin to SDA (Pin A4 of Arduino)
- The C/R pin connects to SCL (Pin A5 of Arduino)
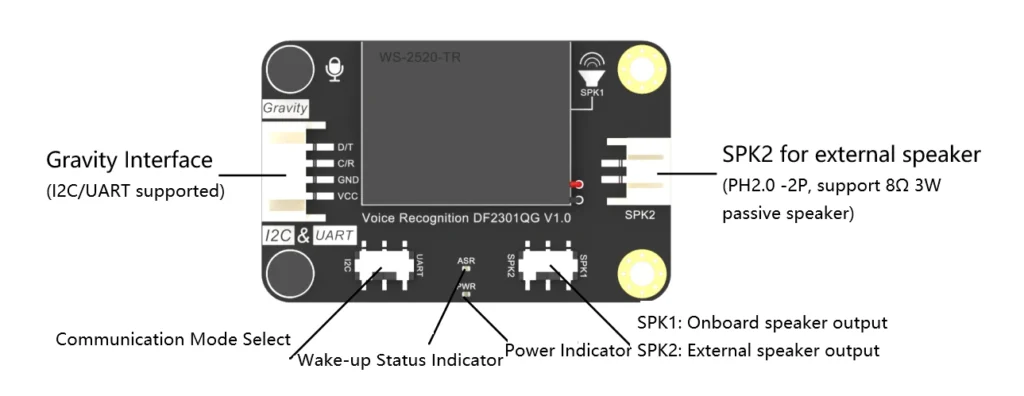
- Make sure the toggle switches are set to the right mode, I2C and the other one to SPK1.
- Connect an LED to pin no. 13 (there should be an onboard LED connected to this pin)
NOTE: SPK2 is for an external speaker.
Coding:
#include "DFRobot_DF2301Q.h"

#define LedPin 13
DFRobot_DF2301Q_I2C asr;

void setup()
{
  Serial.begin(115200);
  pinMode(LedPin, OUTPUT);
  digitalWrite(LedPin, LOW);

  while (!asr.begin())
  {
    Serial.println("Failed to connect! Check wiring.");
    delay(3000);
  }
  Serial.println("Module ready!");

  asr.setVolume(4); //Volume value(1-7)
  asr.setMuteMode(0);
  asr.setWakeTime(20); //Wake-up duration (0-255)
  Serial.print("WakeTime = ");
  Serial.println(asr.getWakeTime());
}

void loop()
{
  uint8_t cmd = asr.getCMDID();
  switch(cmd)
  {
    case 103:
      Serial.print("Command ID: ");
      Serial.println(cmd);
      digitalWrite(LedPin, HIGH);
      delay(200);
      break;

    case 104:
      Serial.print("Command ID: ");
      Serial.println(cmd);
      digitalWrite(LedPin, LOW);
      delay(200);
      break;
  }
}
Copy this code into the Arduino IDE and upload it to the board. If you are completely new to Arduino, I recommend that you check out “Introduction to Arduino“.
Testing the module.
To test the module, first power it on—you’ll hear a voice response confirming it’s working. Now, follow these steps:
- Use the wake-up word “Hello robot”, you’ll see a blue LED light up on the module and hear a voice response, confirming it’s ready to receive commands.
- To turn on the light, say “Turn the light on.” The module will respond with voice feedback, and the default onboard LED should light up.
- Saying “Turn the light off” will also give you voice feedback and turn the onboard LED off.
This is a very simple example to test the Gravity: Offline Voice Recognition Module by DFRobot.
Final Verdict
Pros:
- Offline control: private and fast.
- Flexible: built-in + custom commands.
- Dual-mic design with audio feedback.
- Works with Arduino, ESP32, Raspberry Pi, micro:bit…
Cons:
- High power draw (~370 mA)—may need a stable power supply.
- Learning process needs repetition—might take patience.
- Limited commands because of offline functioning.
What You Can Build Next?
- Voice-controlled lights or home automation
- Voice‑responsive pet feeder
- Hands‑free robotics interface
Let me know if you want a full tutorial with code for any of these!

