

Hello and welcome to my blog. Here I will be sharing my projects, tutorials and reviews so if you are interested make sure you subscribe to get updates. If you are familiar with the name “WolfxPac” then you have probably seen my posts on sites like Hackster.io and Instructables.com. I have been sharing tutorials on these sites for a while now and I decided to start my own blog.
For first blog I wanted to post something simple, specially for beginners and what better than an introduction to arduino? So without any further ado, lets get right into it.
Disclaimer: This blog contains Amazon Affiliate links. Buying product from those links helps us run this blog without any charges on you.
What Is Arduino?

Arduino is a microcontroller development board by Arduino.cc. It is based on Atmel’s microcontroller series. There are different boards for different applications, most popular ones being Arduino Uno, Arduino Mega and Arduino Nano. If you want to learn more about these boards check out this Wiki page. This article is specifically based on one of the most versatile board by Arduino that is UNO.
Arduino Uno:
Arduino uno is a development board based on Atmega328 and comes with Arduino Boot-loader pre burnt. This board has 14 GPIO out of which 6 are PWM enabled and 6 Analog pins. It has USB interface to burn the program onto the chip and can be powered through a DC power jack (9v-12v), Vin pin (6v-9v) or the USB itself.
The board can be used to control external devices through the GPIO pins. But it must be programmed first. An IDE (Integrated Development Environment) by Arduino is used for this purpose. The programming language used by arduino is based on C++, so if you have any experience with C or C++ then using Arduino will be a piece of cake
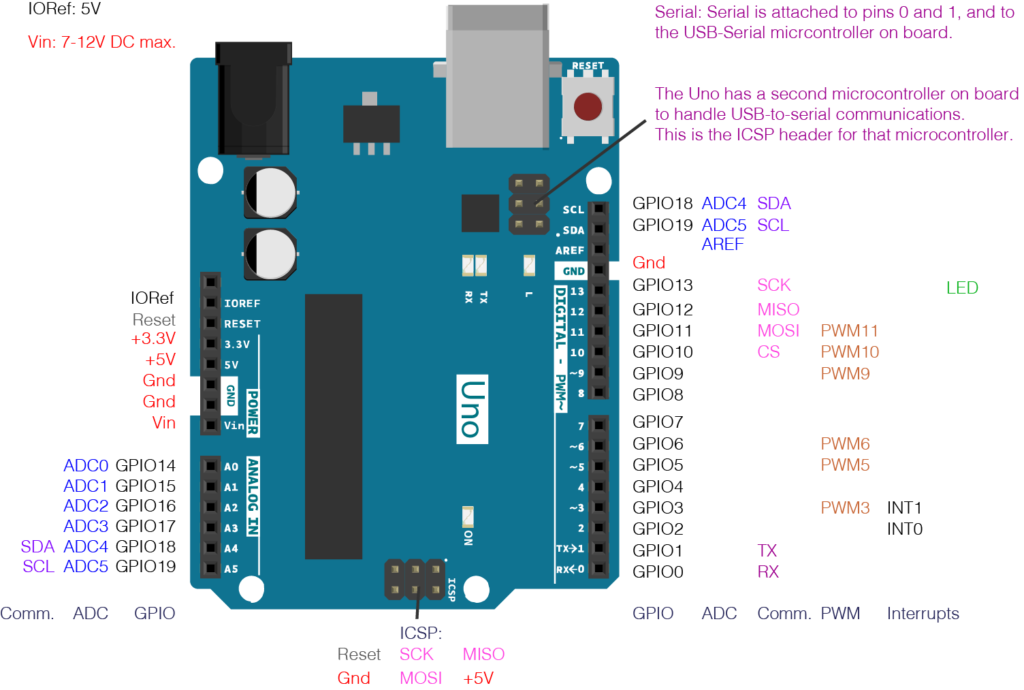
Check out arduino uno’s pinouts and it’s special features for more details.
Specifications:
- Microcontroller: ATmega328
- Operating Voltage: 5V
- Input Voltage (recommended): 7v -12V
- Input Voltage (limits): 6-20V
- Digital I/O Pins: 14 (of which 6 provide PWM output)
- Analog Input Pins: 6
- DC Current per I/O Pin: 40 mA
- DC Current for 3.3V Pin: 50 mA
- Flash Memory: 32 KB of which 0.5 KB used by bootloader
- SRAM: 2 KB (ATmega328)
- EEPROM: 1 KB (ATmega328)
- Clock Speed: 16 MHz
Pinout’s:
Requirements:

- Arduino Uno with USB cable (Amazon US / Amazon EU)
- LED (Amazon US / Amazon EU)
- 220 ohm resistor (Amazon US / Amazon EU)
- Breadboard and jumpers (Amazon US / Amazon EU)
- Arduino IDE.
After you have gathered everything and installed Arduino IDE we can move on to next step.
Circuit:
Make the connections according to the diagram below:
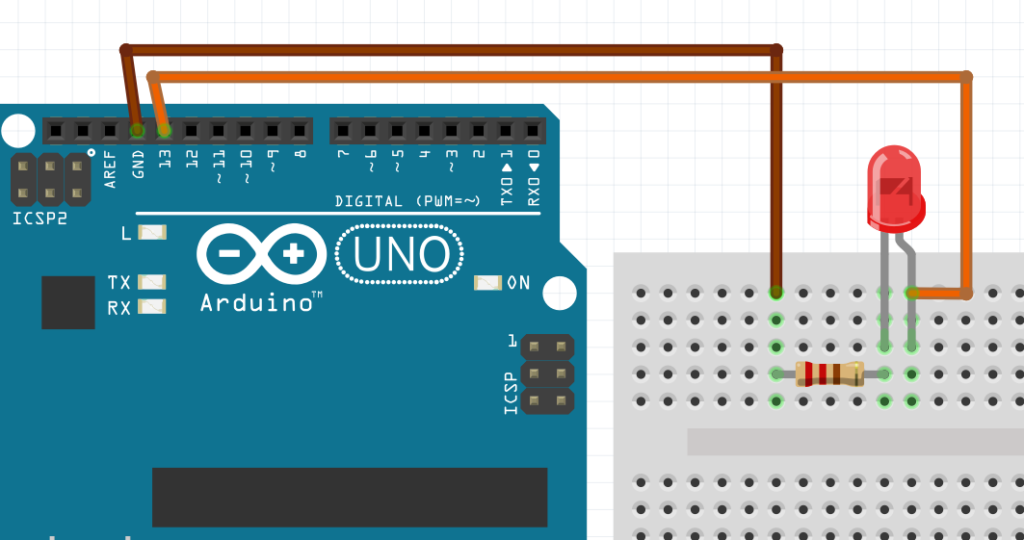
The positive terminal of LED is connected to pin 13 of arduino and negative terminal is connected to ground through a 220 ohm resistor.
After the connections are made, we can upload the code to the arduino which will make the LED blink.
Coding:
- First download and install the Arduino IDE and open it.
- Connect the Arduino uno to your PC using USB cable.
- Goto Tools >> Port and select the COM port to which the arduino is connected.
- Now write the code given below:
#define LED 13 //define pin 13 as LED

void setup()
{
    pinMode(LED, OUTPUT); //sets pin 13 as output
    digitalWrite(LED, LOW); //turns LED off
}

void loop()
{
    digitalWrite(LED, HIGH); //turns LED on
    delay(2*1000); //waits for 2 sec
    digitalWrite(LED, LOW); //turns LED off
    delay(2*1000); //waits for 2 sec
}
Save the code and upload it to arduino using the arrow on top left corner.
Now you will see the LED blink, it will stay on for 2 seconds and then turn off for 2 seconds. Here is an example:
Final Note:
Now some trouble shooting, If you are getting any errors while uploading then you probably have a clone board. No need to panic, Arduino is an open source platform so different manufacturers can copy and modify the design. So now all you have to do is install the proper drivers.
All the information about the drivers are usually provided by the seller but most common driver you might need is ch340g. Just download and install it , restart the IDE and you are ready to upload.
This article was aimed at beginners who are just getting started. In future posts we will learn about different devices and sensors that can be used with arduino to build awesome projects.
12 thoughts on “Introduction To Arduino Uno”
Good explanation for biginers.Thanku
Thank you 🙂
Simple First step for a good student
Hello Raj,
I’m glad you liked the article.
You can subscribe for more.
Thank You.