

RoMeo BLE by DFRobot is an open-source, Arduino-based robot controller board. In this blog let us learn more about the board and how to use it. So without wasting any more time, let’s get right into it.
What is RoMeo BLE?
A new addition to the RoMeo family of boards, the RoMeo BLE is an upgraded version of the popular RoMeo all-in-one board. It inherits all the properties of its predecessor and adds BLE to it for additional wireless functions.
The RoMeo BLE, based on the popular Arduino UNO, is an upgraded version specifically tailored for robotic projects. The RoMeo BLE shares a similar GPIO layout, ensuring compatibility with existing Arduino shields, making it a highly versatile controller board. Let’s see the hardware specifications.
Specifications:
| Microcontroller | ATMEGA328P |
| Bootloader | Arduino UNO |
| Digital IO | 14 (6 PWM) |
| Analog IO | 8 (10Bit) |
| Communication Interface | I2C, SPI, UART, BLE, USB 2.0, APC220 Socket |
| Motor Control | L298P 40V 2A |
| Power Supply | USB, 5V, 24V |
| Dimensions | 94mm x 80mm |
Software:
The RoMeo BLE, built on the ATmega328P and running Arduino UNO firmware, is fully compatible with the Arduino IDE and various Arduino Libraries. To program the board, just download the latest version of Arduino IDE from the official website.
Where to buy?
you can get the RoMeo BLE Robot controller from DFRobot’s official website for $39.50
Let’s get started.
If you’re new to Arduino, I recommend checking out the “Introduction to Arduino UNO” to familiarize yourself with the basics before continuing here.
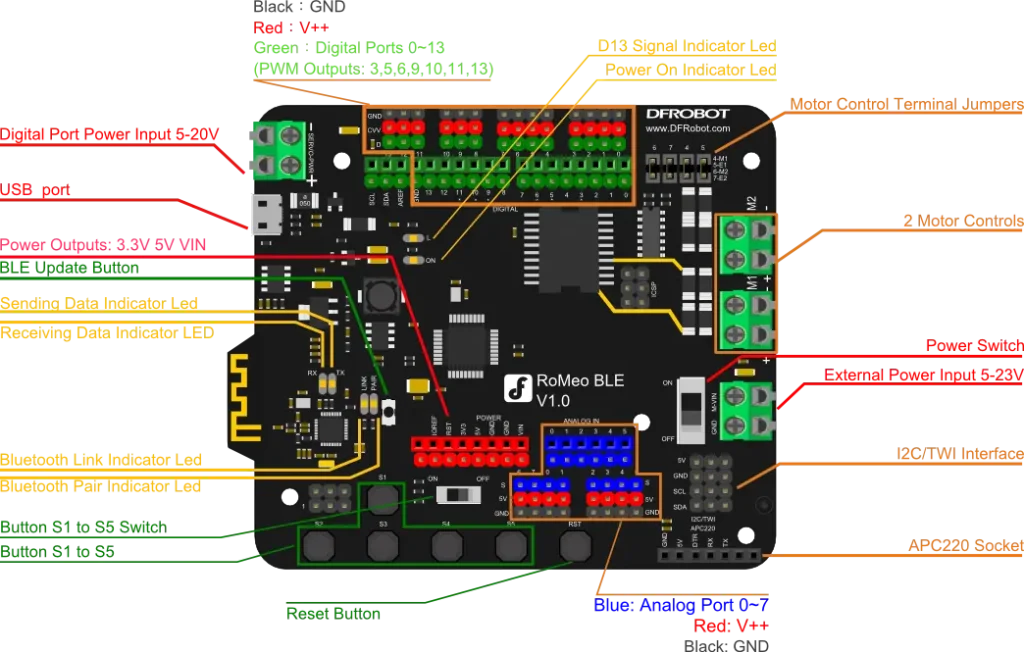
Before you begin, take a moment to familiarize yourself with the board’s ports. For power inputs, the board offers a VIN pin similar to the Arduino UNO. Additionally, you can use the USB port, which provides 5V, or choose from two external power input options. Let us look into these power options in detail.
USB 2.0.
The board features a USB 2.0 port for programming the ATmega328 chip and powering the board. This USB port delivers a stable 5V at 500mA, enough to power the ATmega and handle basic tasks like controlling GPIO to manage LEDs or low-power sensors without issues. However, the port cannot supply sufficient power for devices like servos or DC motors.
Servo Power Terminal.
Next to the USB port, you will find a 2-pin screw terminal labelled “Servo_PWR” which powers servos. If you’re new to using servos, check out the guide “How to Use Servos with Arduino” for all the essential information.
The Servo Power Terminal accepts power ranging from 5V to 20V, depending on the servos you use. Most hobby-grade servos operate between 6V to 12V. Always verify your servo’s power requirements before connecting it to the board.
Motor Power Terminal.
You will find three additional screw terminals across the board. The first two, placed close together, are output pins for motor connections. The third terminal is for external motor power. While the onboard motor driver supports up to 40V and 2A, RoMeo’s technical specifications recommend using 5V to 23V for motors. As always, verify the voltage requirements of your motors before connecting them.
To learn more in-depth about motor drivers, do check out “Everything you need to know about motor drivers”
Note: Always check the polarities when connecting power to the board. Reversing the battery polarity can damage the board. Verify the labels on the board before connecting. The negative terminal of the battery must connect to the GND or Minus terminal on the board, while the positive terminal should connect to the Plus or M_VIN terminal.
Uploading the first code.
To begin, let’s start with a simple project using the buttons on the RoMeo board. Note that all buttons connect to a single analogue pin (A7). If you’re new to buttons and want to learn how they work with Arduino, check out the guide, “How to Use a Push Button with Arduino“.

To use buttons S1 to S5, first toggle the switch to the ‘ON’ position. This connects the analog pin A7 to the buttons. Additionally, the button on the far right, labelled “RST”, serves as the reset button. Pressing it manually resets the ATmega328 IC.
You might wonder how five buttons connect to a single pin and how the board detects which button is pressed. The mechanism is simple: each button connects to a different resistor. When you press a button, it sends a unique analog value to the pin, allowing the board to identify which button was pressed.
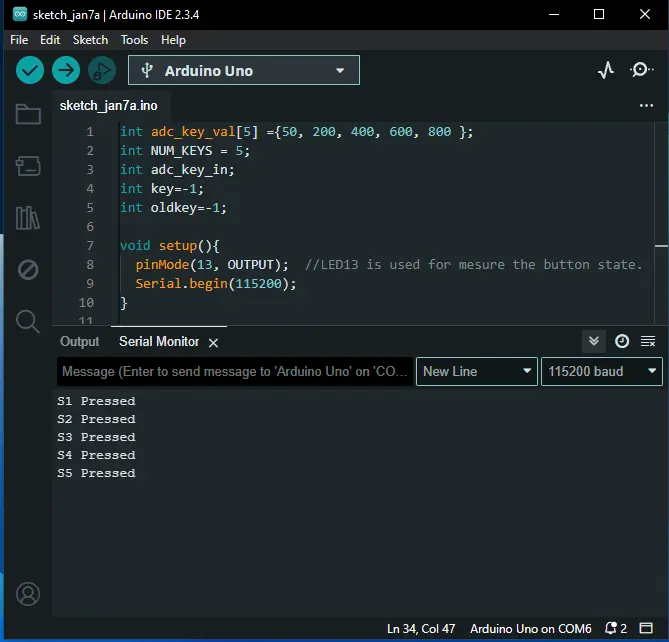
Code:
int adc_key_val[5] ={50, 200, 400, 600, 800 };
int NUM_KEYS = 5;
int adc_key_in;
int key=-1;
int oldkey=-1;

void setup(){
  pinMode(13, OUTPUT);  //LED13 is used for mesure the button state.
  Serial.begin(115200);
}

void loop(){
  adc_key_in = analogRead(7);
  digitalWrite(13,LOW);
  key = get_key(adc_key_in);  //Call the button judging function.

  if (key != oldkey){   // Get the button pressed
      delay(50);
      adc_key_in = analogRead(7);
      key = get_key(adc_key_in);
      if (key != oldkey)    {
        oldkey = key;
        if (key >=0){
          digitalWrite(13,HIGH);
          switch(key){          // Send messages accordingly.
             case 0:Serial.println("S1 Pressed");
                    break;
             case 1:Serial.println("S2 Pressed");
                    break;
             case 2:Serial.println("S3 Pressed");
                    break;
             case 3:Serial.println("S4 Pressed");
                    break;
             case 4:Serial.println("S5 Pressed");
                    break;
          }
        }
      }
  }
  delay(100);
}

// To know the pressed button.
int get_key(unsigned int input){
    int k;
    for (k = 0; k < NUM_KEYS; k++){
      if (input < adc_key_val[k]){     // Get the button pressed
            return k;
      }
   }
   if (k >= NUM_KEYS)k = -1;  // No button is pressed.
   return k;
}
Before uploading the code, make sure the following things are done:
1. Download and install the latest Arduino IDE.
2. Connect the RoMeo BLE board to your computer using a Micro USB cable.
3. Goto >>Tools >> Boards >> Arduino AVR Boards >> Arduino UNO.
4. After selecting the board, select the COM port and you are ready to upload the code.
Once the code is successfully uploaded, open the serial monitor and select the baud rate ‘115200’ and press any keys and see the result.
Now you know what the RoMeo BLE robot controller board is and how to get started with it. This was just a small example to showcase its capabilities. In the future, we’ll explore more exciting projects and possibilities with this amazing board, so stay tuned! If you have any questions or doubts about the board, feel free to leave a comment below.
2 thoughts on “Robot Controller Board – RoMeo BLE”