
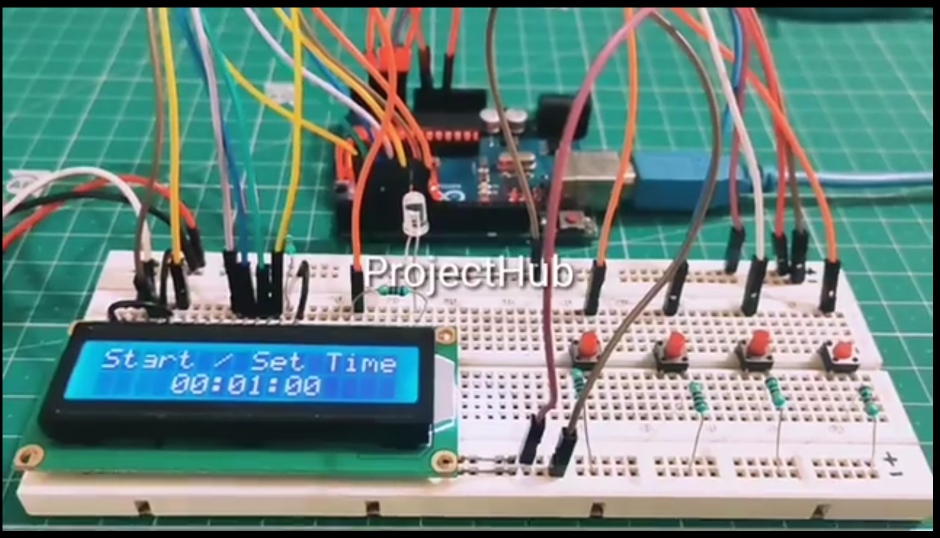
Recently I shared a video on Facebook demonstrating a programmable relay timer using Arduino. The video got a lot of attention very quickly. I got many comments asking for the schematics and code. So I decided to write this tutorial.
In this article, I will share all the details on how to make a programmable relay timer along with its schematics and code.
Requirements:
To build this project we need the following components. The links provided here are affiliated links by Amazon and Aliexpress. If you use them to buy the product, we get a small commission without any extra charges on you.
Hardware :
| Arduino UNO | Amazon US | Amazon IN | Aliexpress |
| 1602 LCD | Amazon US | Amazon IN | Aliexpress |
| 4 x Push buttons | Amazon US | Amazon IN | Aliexpress |
| 2 x 1KΩ Resistors | Amazon US | Amazon IN | Aliexpress |
| 1 x 10KΩ Pot | Amazon US | Amazon IN | Aliexpress |
| Breadboard Kit | Amazon US | Amazon IN | Aliexpress |
Software:
Connections.
In the image below you can see the connections. I have used Tinkercad for making this circuit. If you don’t have the components at hand and still want to try this project, you can do that with TinkerCAD.com
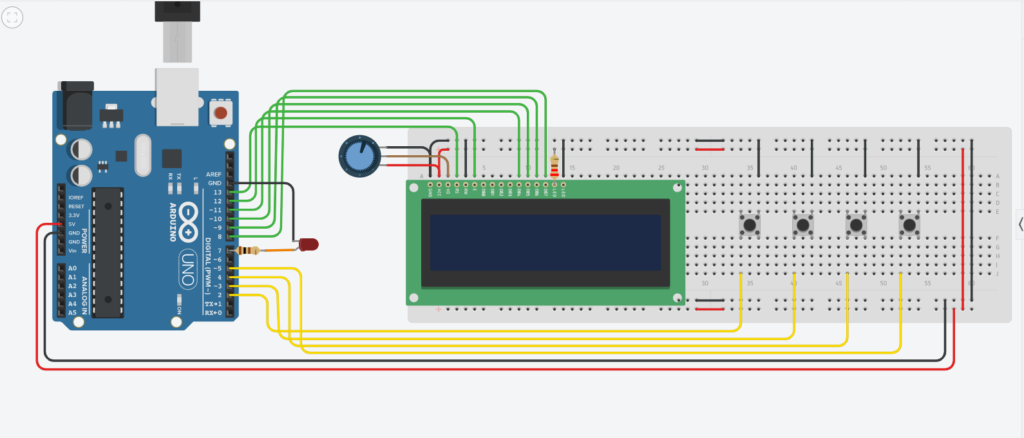
The LCD connections are as follows:
- RS = pin 13
- EN = pin 12
- D4 = pin 11
- D5 = pin 10
- D6 = pin 9
- D7 = pin 8
- RW = GND
- VCC = +5V from Arduino
- VDD = GND
- A = +5V through 1K resistor
- K = GND
- 10K pot is connected to V0 of LCD, it will help us control the contrast of display. Just connect the center pin to V0 and the other pins to +5V and GND.
Connections for Buttons and Relay:
- First button = pin 2. This is the start/stop switch.
- Second button = pin 3. This is the increment button. It will increase the timer value by +1.
- Third button = pin 4. This is decrement button. It will decrease the timer value by -1.
- Forth button = pin 5. This is the select or set button. It toggles between Hours/minutes .
- There are two free pins 6 and 7 set for buzzer and relay respectively.
In the diagram and the video I have used an LED for demonstration but you can add a Relay module there.
Programmable relay timer program.
Before we can upload the code, we need to install a library. To install the library, follow the steps given bellow.
- Open Arduino IDE and goto Tools >> Manage Libraries.
- In the pop up window, type “LiquidCrystal” and down the first library by Arduino.
- This library will allow us to use the display. After successfully installing the library restart the IDE.
Copy the code given below and past it in the IDE.
#include <LiquidCrystal.h>
#include<EEPROM.h>

const int rs = 13, en = 12, d4 = 11, d5 = 10, d6 = 9, d7 = 8;
LiquidCrystal lcd(rs, en, d4, d5, d6, d7);
const int stsp = 2;
const int inc = 3;
const int dec = 4;
const int set = 5;
const int buzz = 6;
const int relay = 7;
int hrs = 0;
int Min = 0;
int sec = 0;
unsigned int check_val = 50;
int add_chk = 0;
int add_hrs = 1;
int add_min = 2;
bool RUN = true;
bool min_flag = true;
bool hrs_flag = true;

void setup()
{
  lcd.begin(16, 2);
  lcd.clear();
  lcd.setCursor(0, 0);
  lcd.print("  PROJECTHUB.IN");
  lcd.setCursor(0, 1);
  lcd.print("   TIMER RELAY");
  pinMode(stsp, INPUT_PULLUP);
  pinMode(inc, INPUT_PULLUP);
  pinMode(dec, INPUT_PULLUP);
  pinMode(set, INPUT_PULLUP);
  pinMode(buzz, OUTPUT);
  pinMode(relay, OUTPUT);
  digitalWrite(relay, LOW);
  digitalWrite(buzz, LOW);
  if (EEPROM.read(add_chk) != check_val)
  {
    EEPROM.write(add_chk, check_val);
    EEPROM.write(add_hrs, 0);
    EEPROM.write(add_min, 1);
  }
  else
  {
    hrs = EEPROM.read(add_hrs);
    Min = EEPROM.read(add_min);
  }
  delay(1500);
  INIT();
}

void INIT()
{
  hrs = EEPROM.read(add_hrs);
  Min = EEPROM.read(add_min);
  sec = 0;
  lcd.clear();
  lcd.setCursor(0, 0);
  lcd.print("Start / Set Time");
  lcd.setCursor(4, 1);
  if (hrs <= 9)
  {
    lcd.print('0');
  }
  lcd.print(hrs);
  lcd.print(':');
  if (Min <= 9)
  {
    lcd.print('0');
  }
  lcd.print(Min);
  lcd.print(':');
  if (sec <= 9)
  {
    lcd.print('0');
  }
  lcd.print(sec);
  min_flag = true;
  hrs_flag = true;
  delay(500);
}

void loop()
{
  if (digitalRead(stsp) == LOW)
  {
    lcd.clear();
    delay(250);
    RUN = true;
    while (RUN)
    {
      if (digitalRead(stsp) == LOW)
      {
        delay(1000);
        if (digitalRead(stsp) == LOW)
        {
          digitalWrite(relay, LOW);
          lcd.clear();
          lcd.setCursor(0, 0);
          lcd.print("  TIMER STOPPED");
          lcd.setCursor(0, 1);
          lcd.print("----------------");
          delay(2000);
          RUN = false;
          INIT();
          break;
        }
      }
      digitalWrite(relay, HIGH);
      sec = sec - 1;
      delay(1000);
      if (sec == -1)
      {
        sec = 59;
        Min = Min - 1;
      }
      if (Min == -1)
      {
        Min = 59;
        hrs = hrs - 1;
      }
      if (hrs == -1) hrs = 0;
      lcd.setCursor(0, 1);
      lcd.print("****************");
      lcd.setCursor(4, 0);
      if (hrs <= 9)
      {
        lcd.print('0');
      }
      lcd.print(hrs);
      lcd.print(':');
      if (Min <= 9)
      {
        lcd.print('0');
      }
      lcd.print(Min);
      lcd.print(':');
      if (sec <= 9)
      {
        lcd.print('0');
      }
      lcd.print(sec);
      if (hrs == 0 && Min == 0 && sec == 0)
      {
        digitalWrite(relay, LOW);
        lcd.setCursor(4, 0);
        RUN = false;
        for (int i = 0; i < 20; i++)
        {
          digitalWrite(buzz, HIGH);
          delay(100);
          digitalWrite(buzz, LOW);
          delay(100);
        }
        INIT();
      }
    }
  }
  if (digitalRead(set) == LOW)
  {
    delay(500);
    while (min_flag)
    {
      lcd.clear();
      lcd.setCursor(0, 0);
      lcd.print("SET MINUTE: ");
      lcd.print(Min);
      delay(100);
      if (digitalRead(inc) == LOW)
      {
        Min = Min + 1;
        if (Min >= 60) Min = 0;
        delay(100);
      }
      if (digitalRead(dec) == LOW)
      {
        Min = Min - 1;
        if (Min <= -1) Min = 0;
        delay(100);
      }
      if (digitalRead(set) == LOW)
      {
        min_flag = false;
        delay(250);
      }
    }
    while (hrs_flag)
    {
      lcd.clear();
      lcd.setCursor(0, 0);
      lcd.print("SET HOUR: ");
      lcd.print(hrs);
      delay(100);
      if (digitalRead(inc) == LOW)
      {
        hrs = hrs + 1;
        if (hrs > 23) hrs = 0;
        delay(100);
      }
      if (digitalRead(dec) == LOW)
      {
        hrs = hrs - 1;
        if (hrs <= -1) hrs = 0;
        delay(100);
      }
      if (digitalRead(set) == LOW)
      {
        hrs_flag = false;
        delay(250);
      }
    }
    if (hrs == 0 && Min == 0)
    {
      lcd.clear();
      lcd.setCursor(0, 0);
      lcd.print("  INVAID TIME");
      delay(2000);
    }
    else
    {
      EEPROM.write(add_hrs, hrs);
      EEPROM.write(add_min, Min);
    }
    INIT();
  }
}
- Connect the Arduino to your computer and open tools in IDE. Select Arduino UNO in boards and appropriate Port.
- Hit the upload button and wait for the code to up load.
And that’s all. Now you have a programmable relay timer where you can set Time in Hour and minute.
Final Note:
Now you can connect a relay to Pin 7 of arduino and use the timer to set the on time for any number of minute or hours. The timer can be stopped at any moment by long pressing the start key. For more details on how to use the timer just watch the video here.
I hope this tutorial was helpful and you learn’t something new.
If you have any questions please feel free to leave a comment.
Also don’t forget to check out “Weather Monitoring & smart gardening“
If you enjoy our content and learn something new,
Follow us on our social media pages:
Facebook
Instagram
And subscribe to our blog so you stay updated with new tutorials.
Stay safe,
Thank you.