

In a previous post, I gave a sneak peek at a project I was working on. In this tutorial, I will be showing you just that. Today I will be sharing a pretty cool project which will help you monitor elements like Temperature, Humidity, Soil Moisture, water pH and more.
With the help of this project, you can create a weathering or smart gardening system which will monitor plants and keep you updated through the internet. You can also automate things like the light, water pump, fan, etc. based on the data collected.
First, let’s gather some components. Below, I’ve listed everything that is required.
Requirements:
Hardware:
| Arduino Nano | Amazon US | Amazon IN | Aliexpress |
| ESP-01S | Amazon US | Amazon IN | Aliexpress |
| DS3231 RTC | Amazon US | Amazon IN | Aliexpress |
| DHT11 Module | Amazon US | Amazon IN | Aliexpress |
| LM317 Regulator | Amazon US | Amazon IN | Aliexpress |
| 10µF 25V Capacitor x 2 | – | – | – |
| 330Ω Resistors x 2 | – | – | – |
| 536Ω Resistor x | – | – | – |
| 1KΩ Resistor x 1 | – | – | – |
| 2.2KΩ Resistor x 1 | – | – | – |
Software:
Along with the components mentioned above, you might also need a few of the following tools:
Tools:
| Breadboard kit | Amazon US | Amazon IN | Aliexpress |
| Male & Female header pins | Amazon US | Amazon IN | Aliexpress |
| Soldering Kit | Amazon US | Amazon IN | Aliexpress |
| Needle Nose Pliers | Amazon US | Amazon IN | Aliexpress |
| Wire Cutter | Amazon US | Amazon IN | Aliexpress |
Now let’s see how to connect these components.
Connections:
To make it simple, I will divide the connections into 2 parts: Power supply and Logic.
Power Supply:
A proper power supply is very important for any project, especially here as we want two different voltage levels for different components.
First, the Arduino which requires 7.4V – 9V through VIN and then the ESP-01 which needs a stable 3.3V. Anything above that will fry the board and anything below 3.3 will cause a failure.
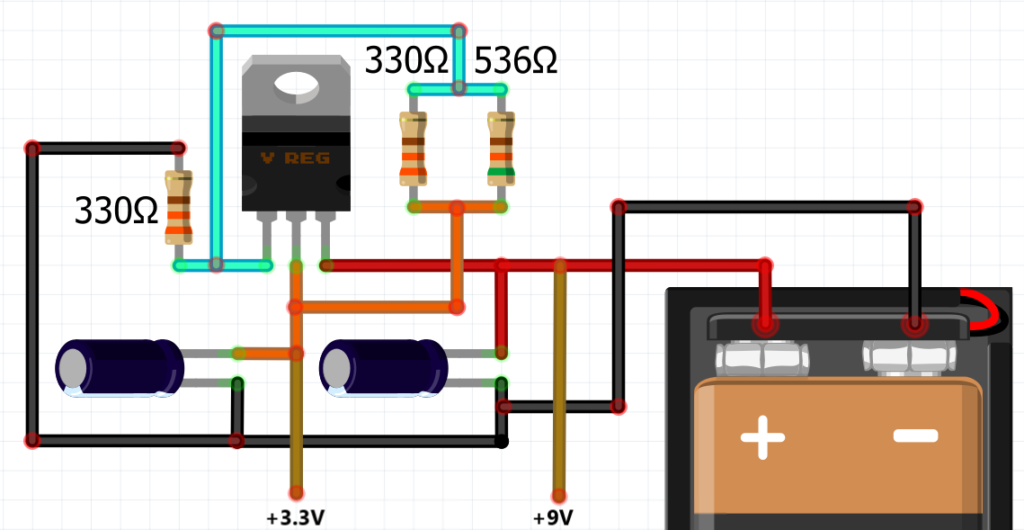
Here you can see an LM317 voltage regulator is used to convert 9V to 3.3V. The positive terminal of the battery will be directly connected to the VIN pin of Arduino Nano.
Logic:
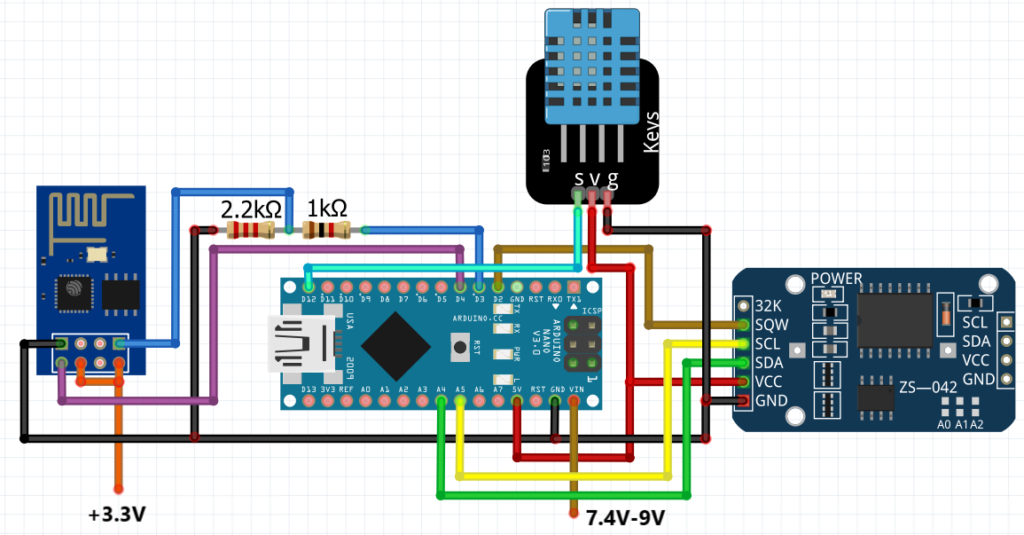
The connections here goes as follows:
- A4 = SDA (RTC)
- A5 = SCL (RTC)
- D2 = SQW (RTC)
- D3 = RX (ESP)
- D4 = TX (ESP)
- D12 = Signal (DHT)
The RTC and DHT11 modules receive power from the +5V of the Nano. The Nano itself will be powered by the battery through the VIN pin. The ESP-01 will receive 3.3V from the voltage regulator.
NOTE: The RX pin of the ESP must have a voltage divider as the Arduino works on 5V logic and it can damage the ESP board. Another thing to keep in mind is the GND. All the GND connections must be connected or else the circuit will NOT work.
Now it’s time to prepare the software that will help us collect data.
Setting up Thingspeak:
Before writing code we need to set up the Thingspeak server. To do that, first, head over to ThingSpeak.com and create an account. After successfully creating an account you will have to create a channel.
- To create a channel click on “New Channels”

- In the new channel first give a name to your channel. As in this project, I am going to collect readings from DHT11, I have named the channel “Temperature & Humidity”
- In the next box, you can describe what this channel is about. This step is optional so I kept it blank.
- Below the description there are Fields. Each field holds one type of data i.e. Temperature/Humidity/Soil Moisture etc. Here as I am collecting two sets of data, I named the fields accordingly.

- After naming the fields, scroll down and click on “Save”. Now go to Channels >> API keys and copy the “Write API key” It should be a string of random alphabets.

We will use this key in our code. It will help our board to write the data to the correct channel.
Programming:
Now I will not bore you will all the little details, instead I will comment on all the parts in the code so you understand it, still if you find something confusing, feel free to leave a comment.
First things first, you need to install some libraries without which the code will not work. Below I have listed the libraries:
- SoftwareSerial
- DS3232RTC
- DHT
To install these libraries open Arduino IDE and click on “Tools” >> “Manage Libraries” from the window that pops up, search for each library individually.
After the libraries are installed successfully now we can move on to coding.
Configuring RTC:
First, you need to set the current time in RTC. To do that use: RTC_Config
In this code you will need to make the following changes:
- Scroll down to setup where you will find the following lines. Just add the Time and date here.
    tm.Hour = 21; //hour (24 hrs clock)
    tm.Minute =30; //minute
    tm.Second = 00; //second

    tm.Day = 03; //day
    tm.Month = 8; //month
    tm.Year = 2020 - 1970; //do not change "1970"
- After editing this part, upload the code onto Arduino. It will not only set the time but also check if your RTC is working.
Main Code:
- Now we need to upload the main code. Download the code from here: Weather monitoring Code.
- Open it with Arduino IDE and edit the following part:
String AP = "SSID";//Enter WiFi Name
String PASS = "PASSWORD"; //Enter WiFi Password
String API = "ABCDEFG123456";//Enter Thingspeak API
- First, enter the WiFi name you wish to connect to.
- Then enter it’s password.
- Finally enter the Thinkspeak’s API key we generated in the previous step. This is important, without it our data will not be sent to the server.
- Next, scroll down and you should find /***RTC***/ here you’ll find the following code:
/**RTC**/
#define ledPin 13
#define wakePin 2
const int time_interval = 2; //Time arduino will be in sleep (min)
- Here as you can see the time_interval is set to 2 minutes which means the Arduino will wake up every two minutes. You can add any time you want in minutes.
- Time interval ensures the Arduino remains in sleep for the defined time and sends periodic data. This also saves battery.
- Now you can upload the code on Arduino.
Testing the project:
Now that the circuit is made and the code is uploaded the project is ready to work. Power the circuit with external 7.4V to 9V power.
NOTE: Make sure you unplug the Arduino board from the computer before adding the batteries or the microcontroller will get damaged.
After powering everything, you should see lights turn on top of Arduino, ESP and the RTC module. Indicating all the components are powered on.
An LED will start blinking on ESP-01. It will continue to blink until a WiFi connection is established. After the WiFi is connected the LED will turn off.
Now head over to thinkspeak and open the channel you created. Here you should see a graph depicting the data collected via the DHT11 sensor.
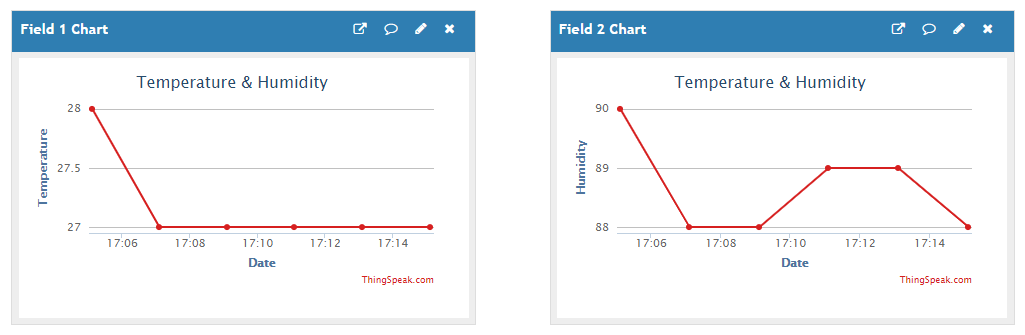
This data can be used for creating a database, making charts and training ML projects.
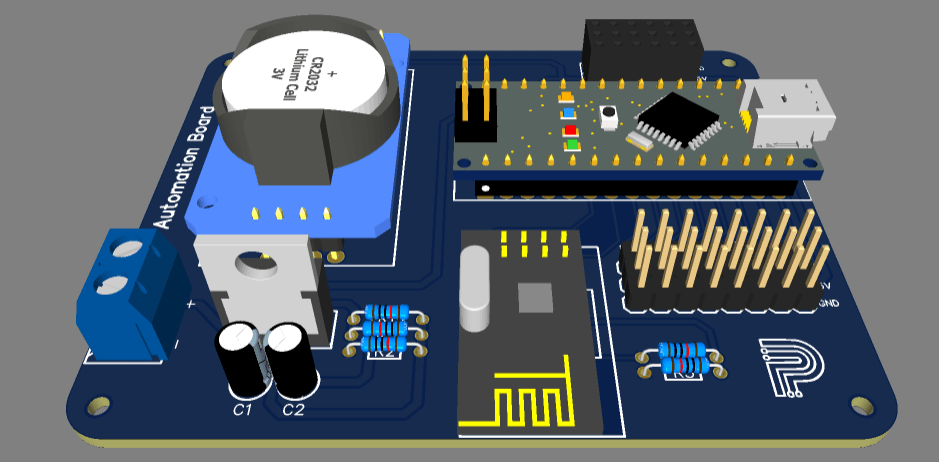
Making PCB:
Now that our circuit works, we can make it into a more professional-looking board. I designed this circuit on EasyEDA and then turned it into a PCB. If you don’t know how to do that, then you mu can check out “How to design a PCB“.

After designing the PCB in EasyEDA, I exported the Gerber files and placed an order to get the PCB manufactured.
Talking about PCB manufacturers, Let me tell you about PCBWay.
PCBWay is a leading PCB manufacturer from China who also provided the PCBs for this project.
I uploaded the Gerber files on PCBWay after which I proceeded to pay for the board. After about 10-15 days I received the boards.
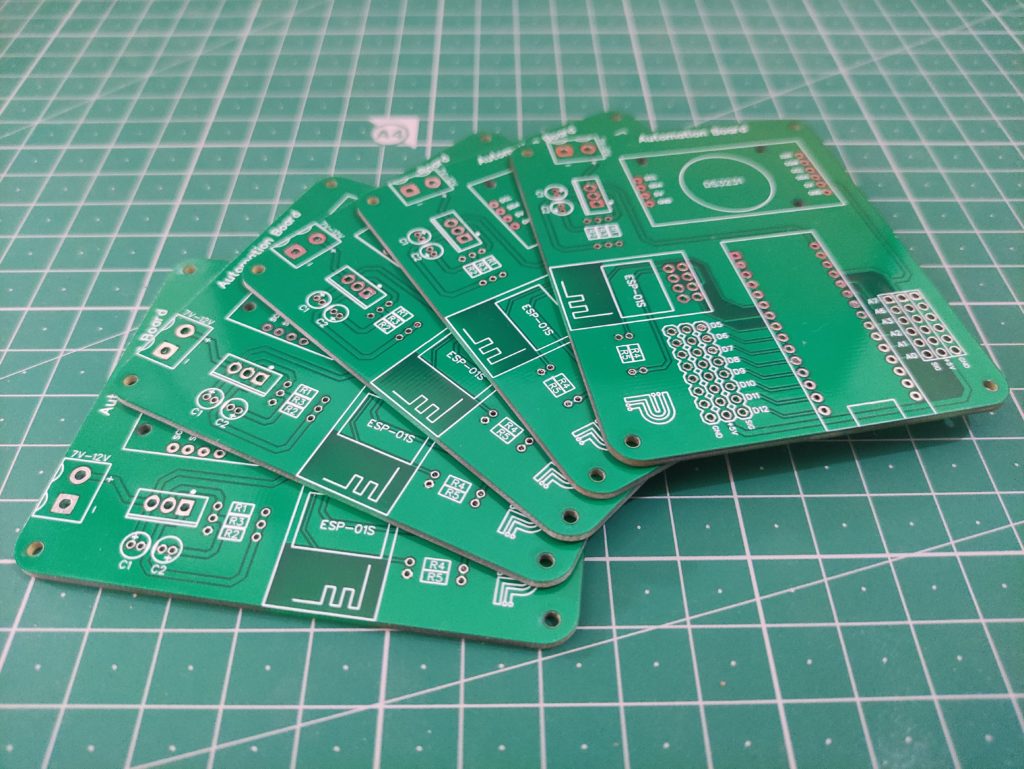
I must say the board quality was amazing. The traces were pretty good concerning I used a track width of 0.25mm. The solder mask layer was evenly spread and there was no exposed copper, I checked with a magnifying glass. Well, overall I really liked the service by PCBway.
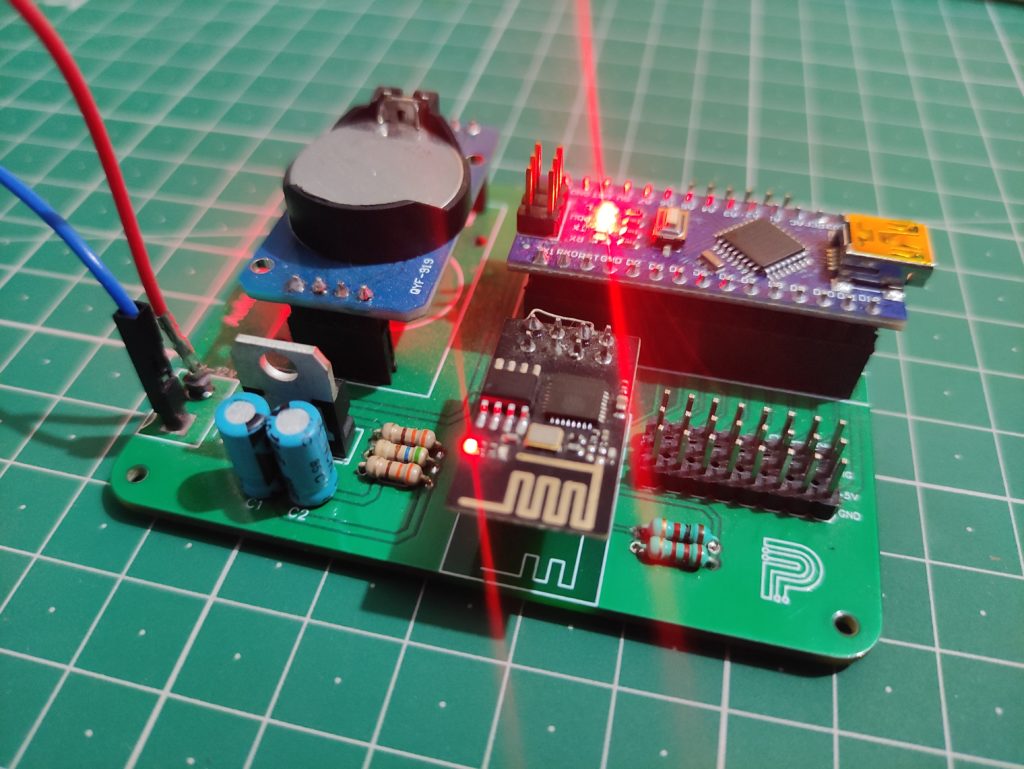
After compleleting the assembly the board looks like this:
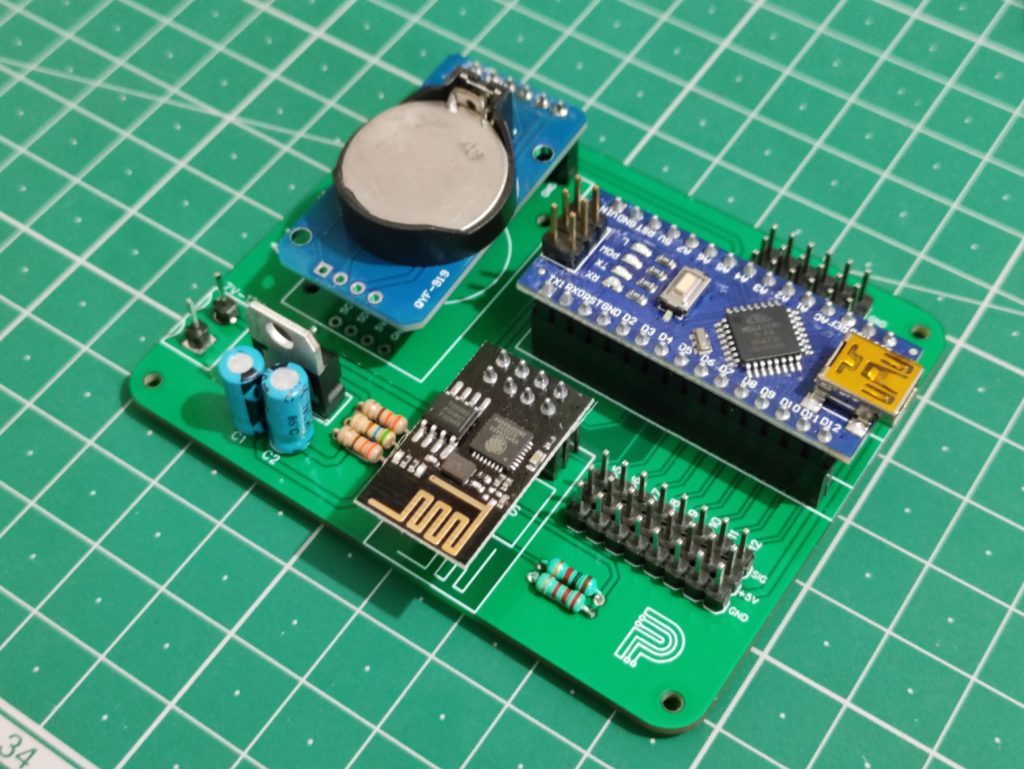
Download the Gerber from: AgroPro.Zip
Final Note:
Along with temperature and humidity you can add a range of sensors to this board like Soil moisture, pH sensor, TDS sensor, etc and get the data online.
Hope you like this tutorial and learned something new. If you have any questions, feel free to ask in the comment section.
One thought on “Weather Monitoring system”