
My very first post here was an introduction to arduino uno. I shared all the basics one needs to know if he/she want’s to get started with Arduino. In this post I will be sharing how to get started with NodeMCU specifically ESP8266.
Here I will be using ESP with Arduino which is my preferred way of programming it.
What is EP8266?
ESP8266 is a Microcontroller introduced by Espressif Systems. Just like an ATmega328 ESP8266 also help you connect and control peripherals through I/O pins. But what makes it different from Atmega328 is the availability of WiFi onboard. Yes this low cost microcontroller lets you connect your projects to the internet.

Many development boards are based on ESP8266 and the one we will be seeing in this post is NodeMCU.
Requirements:
Here is a list of all the parts you will need to execute this project.
| ESP8266 Development Board | Amazon US | Amazon IN | Aliexpress |
| Breadboard kit | Amazon US | Amazon IN | Aliexpress |
| LED | Amazon US | Amazon IN | Aliexpress |
| Arduino IDE | Arduino.cc | – | – |
After you have everything lets move on to the setup.
Setting up the IDE:
- First download and install Arduino IDE if you haven’t already.
- Now open the IDE and goto >> Files >> Preferences.
- You will notice a pop up window and enter the following URL in Additional board manager.
http://arduino.esp8266.com/stable/package_esp8266com_index.json
- Click on OK and now goto >> Tools >> Boards >> Board manager.
- Search for ESP8266 and install the boards. It should look like:
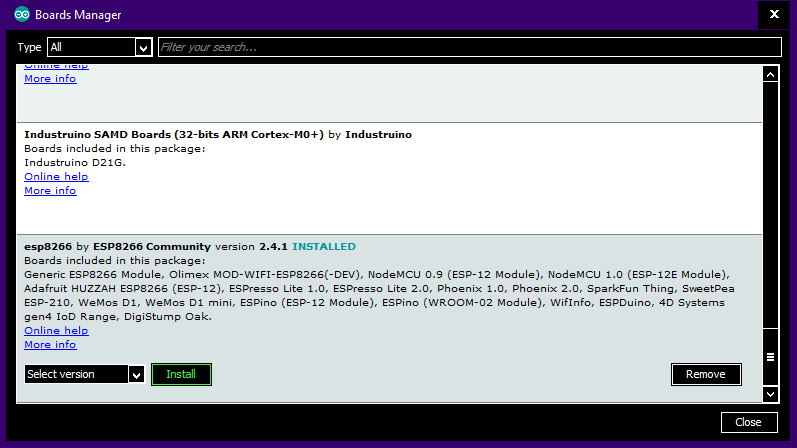
- After installing the boards, restart the IDE. This should load all the ESP8266 based development boards.
- Next you have to install the drivers that will help our computer to recognise the ESP dev board.
- Download and install the CP210X drivers from here.
- Now finally all you have to do is select the right board, com port and you will be ready to upload codes.
- To select the right board goto>> Tools >> Board >> NodeMCU ESP 12E.

Connections:
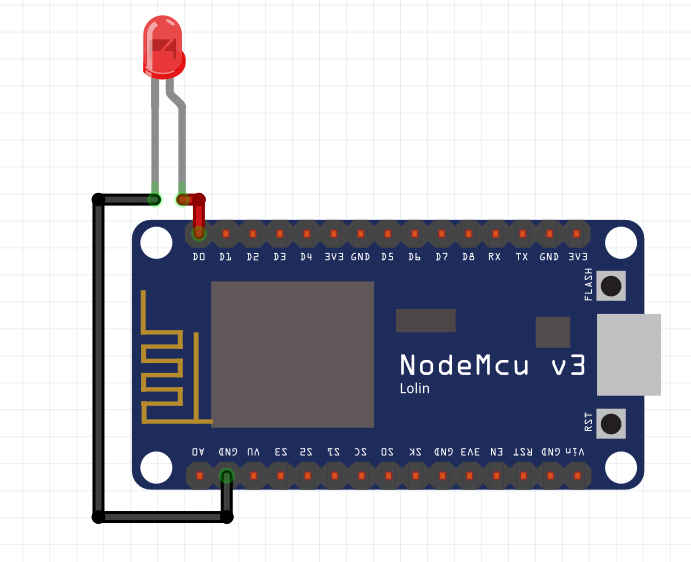
THe connections are fairly basic. Just connect an LED to NodeMCU as shown in the image below.
Uploading a Sketch on NodeMCU.
Now connect the board to your computer via USB and goto tools and select the correct Port.
Now upload the following code:
void setup()
 {
  pinMode(D0, OUTPUT);
}

void loop()
{
  digitalWrite(D0, LOW);
  delay(1000);
  digitalWrite(D0, HIGH);
  delay(2000);
}
After uploading, you it may take a few seconds or a minute to upload.
Then you will notice the LED blink which indicates everything works.
Video Tutorial:
Finally.
Now that the initial setup is done, you are ready to start building bigger projects. I will be sharing many projects based on ESP8266 on this blog. So stay tuned and subscribe to get updates.
Here is a pinout diagram of ESP8266 Dev board for refrence.

Follow ProjectHub on Facebook and Instagram.
Thank you.
3 thoughts on “Getting Started With NodeMCU ESP8266”