
Previously we learned how to control DC motors using Arduino. We used a motor driver IC named L293D for the purpose. Although it does get the job done, it isn’t the best way to do it. The IC can get hot rather quickly and there is no filtering of motor noise which could cause problems in RF communications and data transfer.
To avoid these problems we can use a motor drive board/module. Motor drive boards have a driver IC as the heart with a heat sink and some other electronic components to reduce the motor noise. Let’s see what a motor driver is, how it works and how to use it for our projects.
Disclaimer: This blog contains Affiliate links. Buying products from those links helps us run this blog without any extra charges on you.
What is a Motor Driver Board?
A module with a motor driver IC which helps us control the speed and direction of DC motors is called a motor driver board. There are a variety of motor driver boards in the market. The most popular ones are L298N and L293D-based motor drivers.
These boards are compatible with all Arduino, ESP and similar microcontrollers. In this article, we will particularly look into 2 very popular motor drivers, The L298N Driver and the L293D-based motor controller shield.
So let’s see these boards in more detail.
Requirements:
| Arduino UNO | Amazon Global | Amazon IN | Aliexpress |
| L298N Motor Driver Module | Amazon Global | Amazon IN | Aliexpress |
| Motor Shiled V1.0 | Amazon Global | Amazon IN | Aliexpress |
| DC Geared Motors | Amazon Global | Amazon IN | Aliexpress |
L298N Motor Driver:
This board is very popular in the makers community for its smaller size and power. The IC has a heat sink already which makes the board highly efficient.
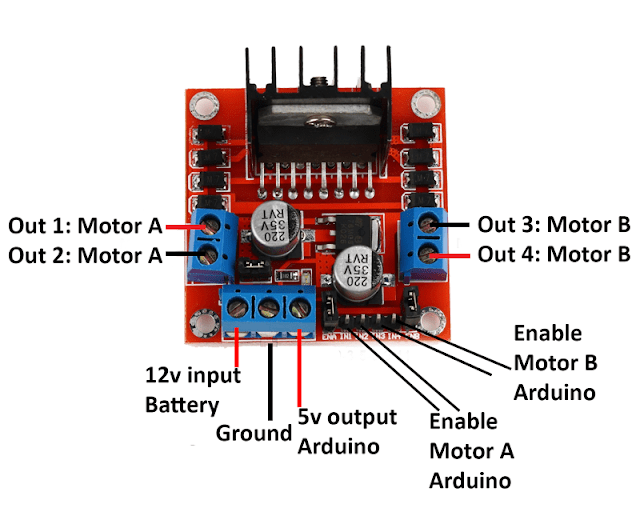
L298N is a dual H-bridge IC, which means we can control 2 motors using this IC.
Here is a list of specifications of the driver:
- Dual H-Bridge Drive Chip: L298N
- Logical Voltage: 5V
- Drive Voltage: 5V-35V
- Logical Current: 0-36mA
- Drive current: 2A (MAX single bridge)
- Max Power: 25W
- Dimensions: 43 x 43 x 26mm
- Weight: 26g
Using this motor driver we can control a 12v-30v motor with a max current of 2A. Using a driver is pretty similar to using bare IC. Check out this tutorial for more information about it.
L293D Motor Shield:
Shields are something you use with Arduino. These boards stack on top of Arduino and we can use them with libraries. It reduces the mess created by wires and saves a lot of space. Here we will see the popular Arduino Motor Shield V1.

This motor shield has two L293D ICs which control two DC motors each, hence we can control four DC motors or two stepper motors using this shield. Along with that, we can also control two servo motors with this shield.
- Double H Bridge Drive Chip: L293D
- Logical Voltage: 5V
- Drive Voltage: 5V-36V
- Logical Current: 0-36mA
- Drive current: 1.2A (MAX single bridge)
- Max Power: 25W
- Dimensions: 69 x 53 x 14.3mm
This motor shield just stacks on top of Arduino and using a library called AFMotor.h we can easily control motors and servos using it.
How To Use Motor Shield?
The motor shield can be stacked upon our Arduino uno or Arduino Mega. Before writing any code, we need to install the library.
To install the library first open the IDE and go to >> Tools >> Manage Libraries
In the search box type “Adafruit Motor Shield” and install the first library.

After the library is installed, go to >> Files >> Examples >> Adafruit Motor Shield Library >> Motor Test.

Next, connect the Arduino to the PC and upload the code. Now connect a DC motor to the M4 terminal and see how the motor works. You will notice that the motor slowly spins in one direction gradually gaining speed and then it does the same in the other direction.
That’s all for this article, now you know how to control a motor using a motor shield or motor drivers. You can use this for testing different codes in the example and learn more. In future, we will use this to create an Arduino-based robot. Till then keep experimenting.
If you have any doubts or questions, feel free to leave a comment. If you enjoy reading my articles and want to learn more, please subscribe 😉
3 thoughts on “Everything You Need To Know About Motor Drivers”
This is a very nice info.I am into Skill Development running a centre as “GRS Electronics Hobby Tutoring Centre”.
That is nice,
You can find more tutorial on our blogs.
Subscribe to get notified about latest blog posts.