
IR technology is nothing new as it has been around for quite a while now. These days you can find IR remotes controlling everything from TVs, Sound systems and Air conditioning systems to Toys, Home automation and much more. So it’s not a surprise to find some old IR remotes lying around in the house. Instead of throwing it away we can do much better things. Maybe automate our homes or build an IR controlled Robot car. But in order to do this first we must understand how this technology works.
In this article, we will see how IR remotes work and how we can decode their signals for reuse. So without wasting any more time, let’s get right into it.
What is IR Technology:
The first question that comes to mind is what is IR technology? IR stands for Infrared. It is a wavelength of light which is invisible to human eyes. IR wavelength ranges between 700nm-1mm, humans can only see light between 400nm-700nm. There are tons of applications for IR light which you can read about here. We will focus on IR for remote controls.
How IR Remotes Work:
In IR remotes, an infrared LED is used to transmit data (in the form of pulses). This data is sent to the IR receiver on the receiving end (TV, toys, etc). The pulses are decoded by the receiver and the action is taken. The actions depend on the codes which differ based on the frequency of light emitted by the IR LED.
You can’t see IR light with your naked eyes but there is a way to check how the LED sends data. For this, you will need a TV remote and your smartphone. Just open your camera and look at the LED on the TV remote as you press a button.

You will notice the LED flicker, the LED might seem solid but it’s just flickering at a very high frequency. So to use the IR remote we must find out what code the buttons are sending via the LED.
Disclaimer: This blog contains Amazon Affiliate links. Buying products from those links helps us run this blog without any charges on you.
Requirements:
- Arduino Uno (Amazon US / Amazon EU)
- IR Receiver (Amazon US / Amazon EU)
- IR Remote (Amazon US / Amazon EU)
After you have everything we can start with setting up the IDE.
Setting up IDE & Uploading Code:
To decode the IR signals, we need to install a library in our IDE. To install this library follow the steps given below:
- Open IDE and go to>> Tools >> Manage Libraries. A pop-up window should show up. Here enter “IRremote” and scroll down, and install “IRremote by shirriff”.
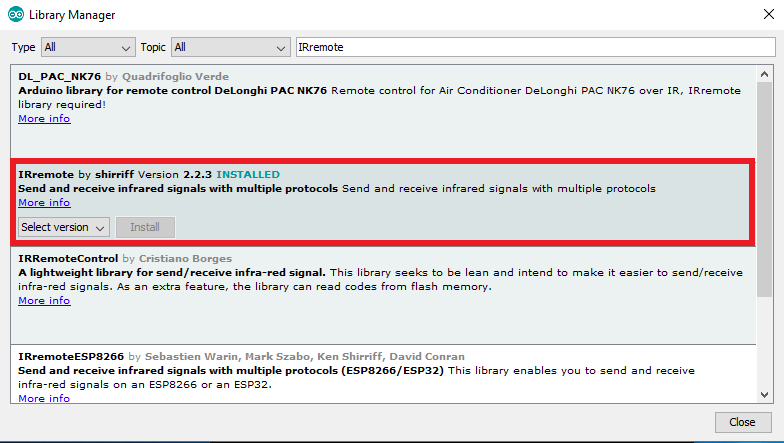
- After installing the library restart the IDE and write the following code:
#include <IRremote.h>

int IRPIN = 2;
IRrecv irrecv(IRPIN);
decode_results result;

void setup()
{
  Serial.begin(9600);
  Serial.println("Enabling IRin");
  irrecv.enableIRIn();
  Serial.println("Enabled IRin");
}

void loop()
{
  if (irrecv.decode(&result))
  {
    Serial.println(result.value, HEX);
    irrecv.resume();
  }
  delay(500);
}
Upload the code to Arduino. Now let’s make connections.
Connections:
Before connecting the IR receiver to the Arduino make sure you know the pinouts. To find the pinouts just enter the name/number of the receiver along with pinouts in Google for example: “1838 pinouts”. It will show you the pins and purpose. As in this example I have used a 1838 receiver.
Here is a pin diagram:
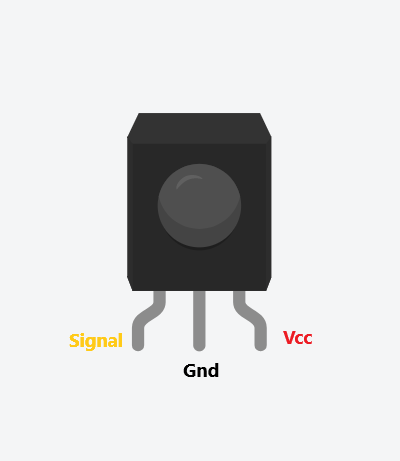
Now that we know the pinouts we can make the connections as shown in the image below:

Connect the Vcc to 3.3v, GND to GND and Signal to pin 2. Now we can start decoding the IR signals.
How to Use it?
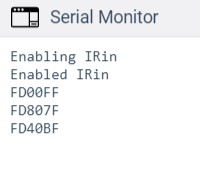
So now we have a sensor connected to our Arduino and the code is uploaded. To decode a Remote first open the Serial monitor. To open the Serial Monitor go to >> tools >> Serial Monitor. Opening the serial monitor will reset the board and now you can point the Remote at the receiver and press the button you want to decode.

Note down the Hex code generated for the buttons. We can use these codes for multiple projects like automation, remote-controlled car etc.
That’s all for this project, now you can decode any IR remotes and reuse them for projects. Learn how to use these codes in the next tutorial. Till then, keep experimenting.
If you like this tutorial and want to learn more, make sure you follow and share this article with your friends 😉
One thought on “Decode Any IR Remote Using Arduino!”