

In the previous article, we delved into IR remotes, exploring their functionality and how to decode signals from any IR remote. If you haven’t reviewed it yet, you can find the link here. I suggest reading it beforehand to gain a better understanding of this tutorial.
In this tutorial, we’ll explore how to utilize the decoded values to control devices such as Relays, toggling them on and off. For demonstration purposes, I’ll showcase this using two LEDs. Let’s dive right in and get started without further delay.
Disclaimer: This blog contains Amazon Affiliate links. Buying products from those links helps us run this blog without any charges on you.
Requirements:
- Arduino Uno (Amazon US / Amazon EU)
- IR receiver (Amazon US / Amazon EU)
- IR remote (Amazon US / Amazon EU)
- Breadboard (Amazon US / Amazon EU)
- LEDs (Amazon US / Amazon EU)
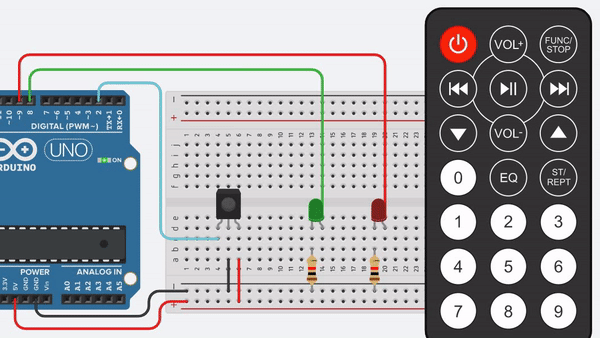
Now that everything is gathered, we can start with making the circuit on a breadboard.
Circuit:

Connect the components as shown in the image above. Like in the previous tutorial, the IR Receiver is connected to pin 2. The LEDs are connected to pins 8 and 9. Once the connections are made, upload the code to the Arduino board, and you’ll be ready to start controlling the LEDs.
Coding:
Before uploading the code, ensure you have installed the IRremote library. You can find instructions on how to do this in the tutorial linked here. Once the library is installed, you can refer to the code provided below:
#include<IRremote.h>

int IRPIN = 2;  //Receiver Pin
int Green = 8;  //Green LED
int Red = 9;  //Red LED

int flag1 = 0; //Indicates state of Green LED
int flag2 =0; //Indicates state of Red LED

IRrecv irrecv(IRPIN); //Reads the signals from receiver
decode_results results; //saves decoded results

void setup()
{
    Serial.begin(9600);
    Serial.println("Enabling IRin");
    irrecv.enableIRIn(); //Starts receiving
    Serial.println("Enabled IRin");

    pinMode(Green, OUTPUT);
    pinMode(Red, OUTPUT);
    pinMode(Green, LOW); //Turns LEDs off by default
    pinMode(Red, LOW);
 }

void loop()
{
    if(irrecv.decode(&results))
   {
      Serial.println(results.value, HEX);
      irrecv.resume();
      if(results.value==0xFD08F7) //If this code is received
     {
        if(flag1 == 0) //If flag state is 0 (LED is off)
       {
          digitalWrite(Green, HIGH); //turns LED on
          flag1 = 1; //Sets flag as 1
       }
       else if(flag1 == 1) //if flag is 1 (LED is on)
      {
         digitalWrite(Green,LOW); //Turns LED off
         flag1 = 0; //sets flag 0
       }
     }

     if(results.value==0xFD8877)
    {
       if(flag2 == 0)
       {
         digitalWrite(Red, HIGH);
         flag2 = 1;
       }
       else if(flag2 == 1)
       {
          digitalWrite(Red,LOW);
          flag2 = 0;
        }
     }
     irrecv.resume(); //Ready to receive next data
 }
}
In the code above we have used the HEX generated by IR remote. The algorithm is fairly simple I recommend you check this tutorial to learn about the flags and how to use them.
Copy and upload this code using Arduino IDE.
Testing:
After uploading the code you can start turning on/off the LEDs using the IR remote.
I trust this tutorial was helpful, and you can integrate this knowledge into your projects, such as home automation. Simply replace LEDs with relays, enabling you to toggle AC appliances on and off.
That concludes this tutorial. If you found it helpful and would like more content, please consider following/subscribing. In the next tutorial, we will create an IR-controlled robot. Until then, keep experimenting and exploring!
One thought on “Controlling Devices With IR Remote!”