

In the previous tutorial, I shared a quick introduction to Arduino Uno. We also learnt how to program the microcontroller to blink an LED. In this article, I will show you how to use a Pushbutton to control the LED. It will be very useful for future projects. So without wasting any more time, let’s begin.
Disclaimer: This blog contains Amazon Affiliate links. Buying products from those links helps us run this blog without any charges on you.
Requirement:
| Arduino UNO | Amazon US | Amazon IN | Aliexpress |
| Breadboard Kit | Amazon US | Amazon IN | Aliexpress |
| Push Button | Amazon US | Amazon IN | Aliexpress |
| LED | Amazon US | Amazon IN | Aliexpress |
Once you have everything we need, we can connect it all and make a circuit. But before that, let’s first see how a push button works.
How A Push Button Works:
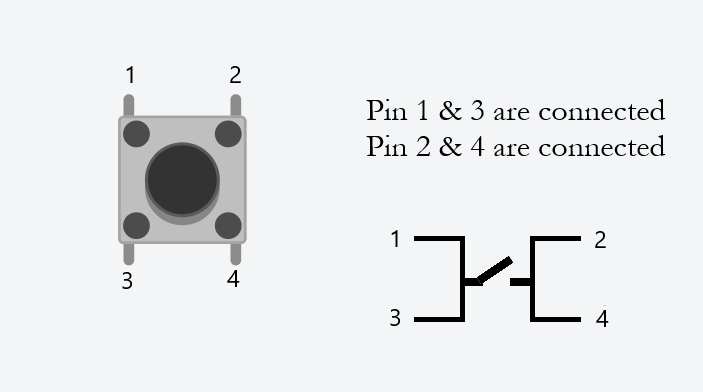
To understand the working refer to the diagram. Usually, push buttons have 4 pins marked as 1,2,3 & 4. The pins in the vertical line are connected. The circuit is completed when the button is pressed and pins 1,3 and 2,4 are shorted.
Circuit:
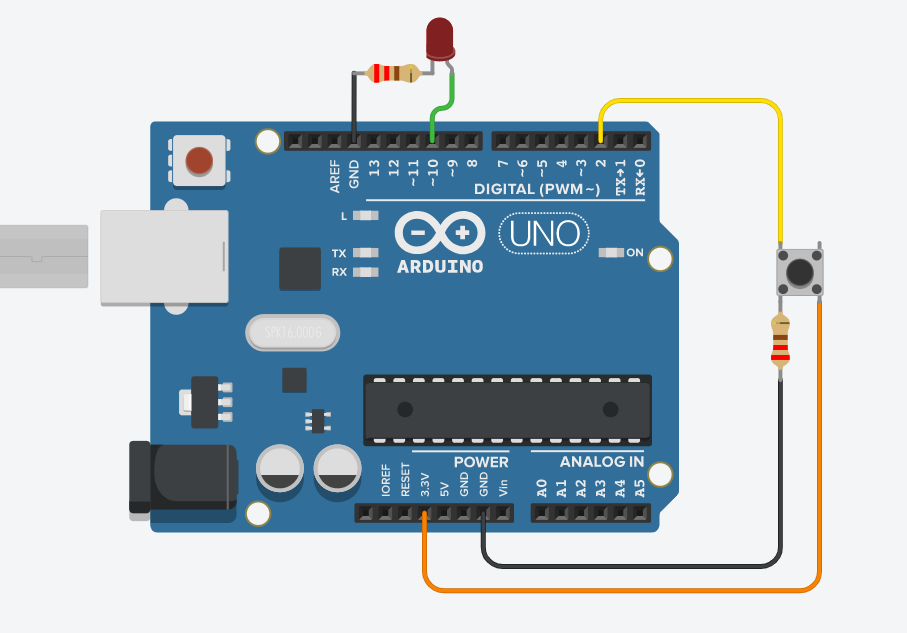
The circuit is simple. Just connect the LED to pin no. 10. Make sure to use a 220 ohm resistor or you might damage the LED. The button is not so hard either. Just connect one terminal of the button to pin no. 2 and ground via 220 ohm resistor. Connect the other terminal to 3.3v. Refer to the diagram below for better understanding.
Coding:
Now that we have made a circuit, we can write a code to use it. The first code is very simple.
#define LED 10 //Declared pin 10 as LED
#define btn 2  //Declared pin 2 as btn
int btn_state = 0;  //Declared a variable btn_state and set it as 0

void setup()
{
   pinMode(LED, OUTPUT);  //Sets pin 10 (LED) as OUTPUT
   pinMode(btn, INPUT);  //Sets pin 2 (btn) as INPUT
 }

 void loop()
 {
    btn_state = digitalRead(btn); //Reads the input of pin 2 and save it in btn_state
    if(btn_state == HIGH)  //If the button is pressed
    {
        digitalWrite(LED, HIGH); //Turn on the LED
    }
     else
    {
        digitalWrite(LED, LOW); //Else turn off LED
    }
 }
This first code is simple, when the button is pressed, the LED turns on and remains on until the button is pressed. You can see how it works in the GIF below.

This works very well but sometimes we need a different arrangement. Let’s say we want to toggle LED on and off using the same switch. For that, we will have to make some changes to the code.
To use the pushbutton as a toggle switch we need to remember the switch state. To save the state we will use flags. Flags are variables that save the state of a pin (High/low or integers).
Let’s take a look at the code:
#define LED 10 //Declared pin 10 as LED
#define btn 2 //Declared pin 2 as btn

int btn_state = 0; //Declared variable to store state (Low by default)
int flag = 0; //Declared variable flag to store switch state

void setup()
{
  pinMode(LED, OUTPUT); //Set LED as output
  pinMode(btn, INPUT); //Set btn as input
  digitalWrite(LED, LOW); //Sets LED LOW by default
}

void loop()
{
  btn_state = digitalRead(btn); //Store btn state (HIGH/LOW)in variable
  if(btn_state == HIGH)//If btn is pressed
  {
    if(flag == 0) //Check if flag is 0
    {
      digitalWrite(LED, HIGH); //Turn LED on
      flag = 1; //Set flag to 1
    }
    else if(flag == 1) //If flag is 1
    {
      digitalWrite(LED, LOW); //Turn LED off
      flag = 0; //Set flag to 0
    }
  }
}
After uploading the above code, you will notice that the LED is off by default. Now press the button once and the LED should turn on. It will remain on until the button is pressed again.
Now you will notice some errors. The circuit is not working as it is supposed to. The button press is registered multiple times or isn’t registered at all. This is because of the button bouncing.
What Is Button/Switch Bouncing?
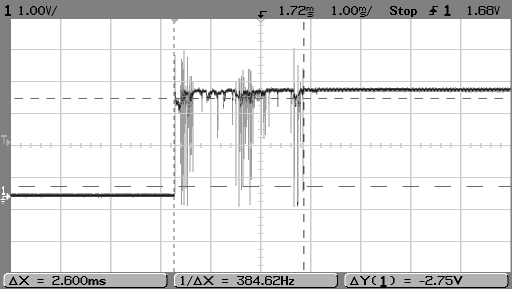
Switch bouncing is a real-world problem that we mostly ignore in theory. It is a common problem which at times can be very annoying. In switches, pressing down a metal plate shorts the terminals’ contacts. In theory, pressing a button should establish contact and close the switch. But what happens is when we press the button, before fully closing the metal plate bounces between the terminals in microseconds. This is not noticeable to humans but this rapid vibration generates a quick pulse of on/off in the microcontroller giving errors in the results.
To overcome this problem we need to add a debouncing method in our code. In the next code, we will add a simple debouncing feature which will eliminate the errors and give us a cleaner result.
#define LED 10
#define btn 2

int btn_state = 0;
int flag = 0;

long lastDebounceTime = 0; // the last time the output pin was toggled
long debounceDelay = 200; // the debounce time

void setup()
{
   pinMode(LED, OUTPUT);
   pinMode(btn, INPUT);
   digitalWrite(LED, LOW);
}

void loop()
{
   btn_state = digitalRead(btn);
   //Filters out the noise by setting a time buffer

   if ( (millis() - lastDebounceTime) > debounceDelay)
   {
     if(btn_state == HIGH)
     {
       if(flag == 0)
       {
          digitalWrite(LED, HIGH);
          flag = 1;
          lastDebounceTime = millis(); //Sets current time
        }
       else if(flag == 1)
       {
         digitalWrite(LED, LOW);
         flag = 0;
         lastDebounceTime = millis(); //Sets current time
        }
      }
    }
}
In the above code we have used a simple debounce method, to explain in simple terms what we do is use a delay (200ms) after the first contact of the plate. When a button is pressed and the initial contact is made, the code initiates a 200ms timer. During this period, it ignores all subsequent contacts, effectively filtering out any noise.
After uploading the code you will notice a better result. The LED turns on and off with every button press. You can utilize this debounce code in any project featuring push buttons or switches to eliminate errors.
That’s all for this tutorial, I hope you like it and understand the concepts. Now you can experiment with multiple LEDs and Buttons to get better at coding.
Here is a list of the Top 5 microcontroller boards in 2021.
If you like my tutorials and want more, feel free to leave a comment and follow me for more updates.
2 thoughts on “How To Use A Push Button With Arduino”